
The control starts up in Incremental jog mode. In order to jog the axes in continuous movement, you need to press the INCR/CONT key to switch from incremental to continuous jog mode.
|
The control starts up in Incremental jog mode. In order to jog the axes in continuous movement, you need to press the INCR/CONT key to switch from incremental to continuous jog mode. |
If you press any of the bridge stop buttons (the four red buttons on the sides of the moving bridge) during a program cycle, the control will activate Feed Hold. You must clear the bridge stop button and then press CYCLE START to cancel Feed Hold and resume movement.
Feed Hold only applies in an automatic cycle. The bridge stop buttons will not stop manual jogging moves.
If you press Emergency Stop, or a fault occurs which causes the Emergency
Stop contactors to open, you must either clear the fault and release E-stop
within about four seconds, or you must wait approximately 20 seconds for
the spindle drive to discharge before you can resume normal operation.
In this situation, you can release Emergency Stop sooner, but the message
"2110 Waiting for Inverter to Discharge..." will be displayed until the
required time has passed.
To perform an automatic tool change use the M6 code, either in a program or at the MDI prompt.
E.g.
M6 T9
will put away whatever tool is in the spindle and will load tool #9.
To put away the current tool without loading a new one, use the M36 code, either in a program or at the MDI prompt.
You can also change tools using the F7/ATC option on the Setup, Offset Library, and Tool Library screens. On those screens, press F7/ATC; enter the tool number you wish to load; and press CYCLE START.
There are 200 tool entries available in the control's Tool and Offset Libraries. However, only tools 1-10 may be used with the automatic tool changer.
As the machine runs and changes tools, it will always put away the old tool in its original carousel bin, before rotating to the new tool.
Use coordinate system #1 (E1, or G54) for the router spindle. Use tool height offsets (G43 Hnn) to adjust for varying lengths of the tools in the carousel.
For example:
M6 T1
M3 S12000
G43 H1
G0 X-1 Y0 Z.1
G1 ...
...
G0 Z.1
G49 H0
M6 T2
M3 S14000
G43 H2
G0 X0 Y-1 Z.1
G81 ...
...
... G80
G49 H0
M6 T3
M3 S2500
G43 H3
G0 X0 Y0 Z.1
...
G49 H0
M36
G53 Z0
The control provides the following custom M functions, in addition to the standard codes listed in the Centroid manual.
| M6 | Automatic Tool Change |
| M21 | Head 1 Down |
| M22 | Dust Hood Down |
| M23 | Head 3 Down |
| M24 | Head 4 Down |
| M31 | Head 1 Up |
| M32 | Dust Hood Up |
| M33 | Head 3 Up |
| M34 | Head 4 Up |
| M36 | Automatic Tool Change to Empty Spindle (just put away tool) |
| M51 | Rotate Saw to 0 degrees |
| M52 | Rotate Saw to 90 degrees |
| M60 | All Drills Down |
| M61 | Drill #1 Down |
| M62 | Drill #2 Down |
| M63 | Drill #3 Down |
| M64 | Drill #4 Down |
| M65 | Drill #5 Down |
| M66 | Drill #6 Down |
| M67 | Drill #7 Down |
| M68 | Drill #8 Down |
| M69 | Drill #9 Down |
| M70 | All Drills Up |
| M71 | Drill #1 Up |
| M72 | Drill #2 Up |
| M73 | Drill #3 Up |
| M74 | Drill #4 Up |
| M75 | Drill #5 Up |
| M76 | Drill #6 Up |
| M77 | Drill #7 Up |
| M78 | Drill #8 Up |
| M79 | Drill #9 Up |
| M80 | Connect Router to Inverter Output |
| M81 | Connect Saw to Inverter Output |
| M83 | Drills Motor On |
| M85 | Drills Motor Off |
In rare cases it may be necessary to operate the tool changer components manually. You can do this using "Maintenance Mode".
To activate Maintenance Mode, press and hold the Aux13 key for 1 second. The Aux13 LED will light to indicate that Maintenance Mode is active.
In Maintenance Mode you can use the Aux10, Aux11 and Aux12 keys to directly operate the tool changer components.
 |
Unclamp tool (momentary) |
 |
Move tool changer down or up (toggle) |
 |
Move tool changer in or out (toggle) |
For example, if a fault occurs with the carousel in and up, with a tool clamped in the spindle, you could:
Simply press Aux12 to retract the carousel (leaving the tool in the spindle), or
In Maintenance Mode, you can also use the blank gray jog keys (in the left-most column, to the left of the Y axis keys) to jog the tool carousel (A axis). The control will not automatically stop A on a whole number position; it is up to you to line up the carousel with the router spindle.
When you are done using the Maintenance Mode controls, press and hold Aux13 for one second again to cancel Maintenance Mode. The Aux13 LED should go out, indicating a return to normal operation.
You cannot run automatic program cycles (including MDI mode) with Maintenance Mode active.
The control keeps track of the "put-back" location for the tool in the spindle using Machine Parameter 171. See Chapter 14 of the Centroid M-Series Operator's Manual for a summary of Machine Parameters.
If you need to override or change the put-back position, you can store a new value in Parameter 171 using MDI mode or the Machine Parameters screen. For example, to set the put-back position to carousel position 5:
In the next tool change, the tool in the spindle would then be put away in position 5.
To indicate that the spindle is empty (there is no tool to put away) set Parameter 171 to zero.
The following parameters are set to provide at-speed and running signals on the auxiliary relay outputs:
| Parameter | Value | Meaning |
| TAB3 -> OC1 | +2 | Close terminal 21 to 19 when at commanded speed |
| TAB3 -> OC2 | +3 | Close terminal 22 to 19 when stopped |
See the Berges ACM-D2 Manual for detailed information on these and other spindle drive parameters.
The PLC program can generate various fault messages, in addition to those listed in the Centroid operator's manual.
You can use the PLC Diagnostic display on the console to view some of the Centroid PLC input and memory locations mentioned with these fault and error conditions. At the control's main screen, press Alt-I to activate the PLC Diagnostic display. Press Alt-I again to dismiss it.
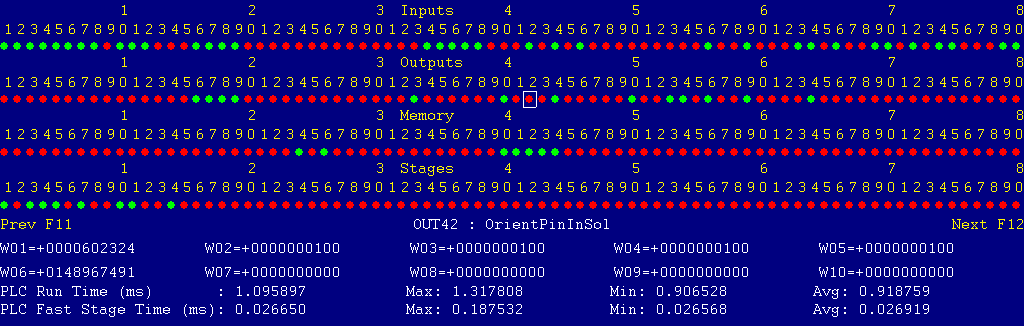
Each page of the Diagnostic display shows four rows of red and green dots: the first row shows PLC inputs 1 through 80; the second row PLC outputs 1 through 80; the third row PLC memory bits 1 through 80; and the fourth row PLC program stages 1 through 80.
You can use the arrow keys to move a highlight box over any of these locations. The name of the highlighted location will be displayed in the center of the screen below the red and green dots.
For example, in the illustration above the highlight box is on Output #42: The dot below the 2, to the right of the superscript 4, on the second line.
Below the four rows of bit status information are ten numeric ("word") variable values, labeled W1 through W10. Some of these variables also hold useful status information, described with the error and fault conditions to follow.
There are multiple pages of Diagnostic data. With the Alt-I diagnostic display showing, you can use the F12 and F11 keys to scroll right and left. For example, pressing F12 once will shift to the page showing inputs and outputs 81 through 160, and word variables W11 through W20.
Most fault conditions must be cleared by pressing and releasing the Emergency Stop button.
The MPU11 motion controller detected loss of fiber optic communication from the GPIO4D interface unit.
Check the optical fibers. Verify that they have not been bent, kinked, or pulled loose from their sockets. Verify that they are both plugged into the correct sockets (1 to 1 and 3 to 3, on both boards).
The GPIO4D interface unit reported back to the MPU11 motion controller a loss of fiber optic communication from the MPU11. This indicates that Fiber 3 is functioning normally, but Fiber 1 may have problems.
Check the optical fibers. Verify that they have not been bent, kinked, or pulled loose from their sockets. Verify that they are both plugged into the correct sockets (1 to 1 and 3 to 3, on both boards).
One or more of the OSS servo drives is reporting a fault condition.
Check the LED displays on the axis drives themselves for a fault code.
Press and release Emergency Stop to clear the fault.
The spindle drive unit is reporting a fault condition.
Check the LED display on the spindle drive itself for a fault code.
Press and release Emergency Stop to clear the fault.
You exited the CNCM control software without first pressing Emergency Stop.
The thermal sensor in the router spindle opened, indicating a motor overload or overheat.
Investigate possible causes. Allow the spindle time to cool. Press and release Emergency Stop to clear the fault.
References:
PLC INP9: indicates sensor state.  Green = 1 = closed = okay, Red = 0 = open = overheat
Schematic: Line 77
An overload unit, either on the spindle drive line starter (K2) or on the drill motor starter (K8) has tripped.
Check the overload units to see which one has tripped. Investigate possible causes.
Press the blue reset button on the overload to reset the trip. Press and release Emergency Stop to clear the fault.
References:
PLC INP10: indicates overload state.  Green = 1 = either tripped, Red = 0 = both okay
Schematic: Lines 4, 19, 77
The power supply module (PSMX) for the X axis servo drive has opened, or failed to close, its "ready" relay. It is either in a fault condition or it is not powered.
References:
PLC INP12: indicates module state.  Green = 1 = closed = okay, Red = 0 = open = fault
Schematic: Line 78
The thermal sensor in the regenerative braking resistor opened, indicating resistor overheating.
Investigate possible causes. Allow the resistor time to cool. Press and release Emergency Stop to clear the fault.
References:
PLC INP13: indicates sensor state.  Green = 1 = closed = okay, Red = 0 = open = overheat
Schematic: Lines 2, 79
The PLCADD1616 expansion board has failed to communicate properly with the GPIO4D board.
Check the gray PLC expansion cable that connects the PLCADD1616 board to the header near the right edge of the GPIO4D board. Check for green 5V power and "PLC OK" LED indicators on the PLCADD1616 board.
The PLC program requested display of an error message, but provided an invalid message code. Notify your dealer.
References:
PLC variable W16: holds the invalid message code
A spindle-start command was received, but neither the router spindle nor the saw motor was connected to the spindle drive.
Program either an M80 or an M81 code before attempting to start the motor.
An M80 or M81 motor-selection command was received, but the spindle drive was already running.
Stop the spindle before switching motors.
During an automatic tool change, the machine was not ready to begin the exchange within the allowed time. The control requires that the spindle motor be stopped; that the router head pneumatic slide be up; and that the dust shroud be up.
References:
PLC INP15: indicates spindle drive stopped.  Green = 1 = stopped, Red = 0 = turning
PLC INP33: indicates router slide position.  Green = 1 = fully up, Red = 0 = not fully up
PLC INP35: indicates dust shroud position.  Green = 1 = fully up, Red = 0 = not fully up
Schematic: Lines 7, 80, 83, 84
During an automatic tool change, the tool carousel failed to slide all the way in (towards the spindle) in the allowed time.
This is typically due to an obstruction in the way (for example, attempting to put a tool away in a carousel pocket that already has another tool in it); or to carousel misalignment (not rotated to line up with a tool pocket); or to lack of air pressure to the cylinder.
Use the Maintenance Mode controls to retract the carousel back to its normal position. Remove any unwanted tool from the spindle or carousel. Check that the position shown for the A axis matches the actual carousel position.
References:
PLC OUT4: carousel-in solenoid.  Green = on = advance in, Red = off = retract out
PLC INP38: indicates carousel position.  Green = 1 = fully in, Red = 0 = not fully in
Schematic: Lines 85, 100
During an automatic tool change, the drawbar in the router spindle failed to open and release the tool within the allowed time.
Use the Maintenance Mode controls to retract the carousel back to its normal position. Check air pressure and pneumatic valve function.
References:
PLC OUT5: tool unclamp solenoid.  Green = on = unclamp, Red = off = clamp
PLC INP41: tool unclamped state.  Green = 1 = unclamped, Red = 0 = not unclamped
Schematic: Lines 87, 101
During an automatic tool change, the tool carousel failed to slide down within the allowed time.
During an automatic tool change, the A axis failed to rotate to the intended position within the allowed time.
During an automatic tool change, the tool carousel failed to slide up within the allowed time.
This is typically due to an obstruction in the way (for example, attempting to insert a tool while there is already a tool in the spindle; or to carousel misalignment (not rotated to line the tool up with the spindle; or to lack of air pressure to the cylinder.
Use the Maintenance Mode controls to move the carousel back to its normal position. Remove any unwanted tools from the spindle or carousel. Check that the position shown for the A axis matches the actual carousel position.
References:
PLC OUT3: carousel-down solenoid.  Green = on = down, Red = off = up
PLC INP36: indicates carousel position.  Green = 1 = fully up, Red = 0 = not fully up
PLC INP37: indicates carousel position.  Green = 1 = fully down, Red = 0 = not fully down
Schematic: Lines 84, 85, 99
During an automatic tool change, the drawbar in the router spindle failed to close and clamp the tool within the allowed time.
During an automatic tool change, the carousel failed to slide back out to its parked position within the allowed time.
During an automatic tool change, the CNC macro failed to acknowledge the completion signal that was sent by the PLC.
The PLC program can also generate the following non-error messages, in addition to those listed in the Centroid operator's manual.
A previous PLC fiber communication fault (9022 or 9023) has been fixed and cleared.
You pressed a keyboard shortcut key for jogging the machine or starting a cycle, but those shortcuts have been disabled on this control.
A previous fault condition has been cleared by pressing Emergency Stop.
![]()